20 분. 5개의 파일. · create-next-app 프로젝트는 WordPress에서 포스트를 끌어 WPGraphQL을 설치, 편집기는 여전히 모든 단락을 소유, 및 next build 선박 정적 페이지 revalidate 원하는 모든 수로 설정. 아래 점에서 산책로 woographqldemo.wpengine.com — 끝에서 자신의 도메인을 교환하고 동일한 6 단계가 적용됩니다.
상자에 있는 무엇이
@axistaylor/nextpress 한 npm 패키지와 TypeScript의 약 6,000 줄입니다. Next.js 16 앱으로 와이어 3 개를 운반합니다.
withWCR– 한국어NextConfigWP 역 프록시 도메인을 설정하고 전달/wp-content·/wp-admin·/graphql다음 실행 시간을 통해.<Content>— React 컴포넌트는 raw HTML WordPress를 반환하고 실제 React 노드로 렌더링하며, per-block CSS를 각각 필요로 합니다.nextImageParser— 모든 것을 스왑하는 파서<img>WP 콘텐츠에서next/image이름 *width·height·sizes블록 속성에서 끌어.
백엔드 요구 사항 : WordPress with RSS 피드 이름 * 모든 호스트 작업 — WP 엔진, Pantheon, Bluehost, 자체 관리 VPS — 긴 /graphql 응답합니다.
1 단계 — 다음 앱을 부팅
제품정보 create-next-app TypeScript 템플릿을 사용하여 추가 @axistaylor/nextpress npm에서:
npx create-next-app@latest nextpress-quickstart
cd nextpress-quickstart
npm install @axistaylor/nextpress
단계 2 — next.config.ts
withWCR 세 가지 인수가 발생합니다. base Next config, WordPress Origin 및 public-facing frontend Origin. wrapper는 모든 절대 WordPress URL을 다시 씁니다. 편집기는 frontend-relative 경로로 승인하여 렌더링 된 게시물 콘텐츠 땅을 다음 경로로 다시 연결합니다.
import type { NextConfig } from "next";
import { withWCR } from "@axistaylor/nextpress/withWCR";

const wpDomain = "woographqldemo.wpengine.com";
const wpProtocol = "https";

const nextConfig: NextConfig = {
  images: {
    formats: ["image/avif", "image/webp"],
    remotePatterns: [{ protocol: "https", hostname: wpDomain }],
  },
  env: {
    GRAPHQL_ENDPOINT: `${wpProtocol}://${wpDomain}/graphql`,
  },
};

export default withWCR(
  nextConfig,
  {
    wpDomain,
    wpProtocol,
    wpHomeUrl: `${wpProtocol}://${wpDomain}`,
    wpSiteUrl: `${wpProtocol}://${wpDomain}`,
  },
  {
    frontendDomain: "localhost:3000",
    frontendProtocol: "http",
  },
);
단계 3 — src/proxy.ts
다음 16 이름 middleware.ts 으로 proxy.ts; 역할과 matcher 행동은 변화하지 않았습니다. 핸들러는 두 가지를 수행합니다. /wp-* 경로를 통해 proxyByWCR 그래서 브라우저는 WordPress 기원을 결코 접촉하지 않고 설정 x-uri 모든 비 프로파일 요청에 헤더 그래서 서버 구성 요소 다운스트림 알고 URI enqueued 스크립트 및 stylesheets에 대한 백엔드 요청:
import { NextResponse, NextRequest } from "next/server";
import { proxyByWCR, isProxiedRoute } from "@axistaylor/nextpress/proxyByWCR";

export const proxy = async (request: NextRequest) => {
  const pathname = request.nextUrl.pathname;

  if (isProxiedRoute(pathname)) {
    return proxyByWCR(request);
  }

  const headers = new Headers(request.headers);
  headers.set("x-uri", pathname);
  return NextResponse.next({ request: { headers } });
};

export const config = {
  matcher: [
    "/atx/:instance/proxiee",
    "/atx/:instance/wp",
    "/atx/:instance/wc",
    "/atx/:instance/wp-internal-assets/:path*",
    "/atx/:instance/wp-assets/:path*",
    "/atx/:instance/wp-json/:path*",
    "/((?!_next|api|favicon.ico|sw.js|.*\\.).*)",
  ],
};
단계 4 — src/lib/wp.ts
3개의 async 기능, 공유되는 1 fetch 래퍼. fetchPosts 인덱스 페이지 피드, fetchPostBySlug 게시물 페이지 피드, fetchPostSlugs 로드 중 … generateStaticParams· next: { revalidate: 60 } 힌트에 fetch 필요한 유일한 캐시 제어 – 다음 나머지를 처리 :
const ENDPOINT = process.env.GRAPHQL_ENDPOINT!;

async function gql<T>(query: string, variables: Record<string, unknown> = {}): Promise<T> {
  const res = await fetch(ENDPOINT, {
    method: "POST",
    headers: { "Content-Type": "application/json" },
    body: JSON.stringify({ query, variables }),
    next: { revalidate: 60 },
  });
  if (!res.ok) throw new Error(`WPGraphQL ${res.status}`);
  const { data, errors } = await res.json();
  if (errors?.length) throw new Error(errors[0].message);
  return data as T;
}

export interface PostSummary {
  slug: string;
  title: string;
  date: string;
  excerpt: string | null;
  featuredImage: { sourceUrl: string; altText: string } | null;
}

export interface Post extends PostSummary {
  content: string;
  contentCssClasses: string;
}

export async function fetchPosts(first = 20): Promise<PostSummary[]> {
  const data = await gql<{ posts: { nodes: PostSummary[] } }>(`
    query Posts($first: Int!) {
      posts(first: $first, where: { status: PUBLISH, orderby: { field: DATE, order: DESC } }) {
        nodes {
          slug title date excerpt
          featuredImage { node { sourceUrl altText } }
        }
      }
    }`, { first });
  return data.posts.nodes;
}

export async function fetchPostSlugs(): Promise<string[]> {
  const data = await gql<{ posts: { nodes: { slug: string }[] } }>(`
    { posts(first: 100, where: { status: PUBLISH }) { nodes { slug } } }`);
  return data.posts.nodes.map(n => n.slug);
}

export async function fetchPostBySlug(slug: string): Promise<Post | null> {
  const data = await gql<{ post: Post | null }>(`
    query Post($slug: ID!) {
      post(id: $slug, idType: SLUG) {
        slug title date excerpt
        content(format: RENDERED)
        contentCssClasses
        featuredImage { node { sourceUrl altText } }
      }
    }`, { slug });
  return data.post;
}
단계 5 — /blog 이름 *
서버 구성 요소, 하나 await, 클라이언트 걸이 없음. 포스트 배열은 다만 JSX입니다:
import Link from "next/link";
import { fetchPosts } from "@/lib/wp";

export const metadata = { title: "Blog" };

export default async function BlogIndex() {
  const posts = await fetchPosts(20);
  return (
    <ul>
      {posts.map((post) => (
        <li key={post.slug}>
          <Link href={`/blog/${post.slug}`}>{post.title}</Link>
          <time>{new Date(post.date).toLocaleDateString()}</time>
        </li>
      ))}
    </ul>
  );
}
단계 6 — /blog/[slug]
generateStaticParams 모든 게시된 slug를 빌드 타임 경로로 전환합니다. 렌더링은 두 줄입니다: 머리와 <Content>·
import { notFound } from "next/navigation";
import { Content, nextImageParser } from "@axistaylor/nextpress";
import { fetchPostBySlug, fetchPostSlugs } from "@/lib/wp";

export async function generateStaticParams() {
  const slugs = await fetchPostSlugs();
  return slugs.map((slug) => ({ slug }));
}

export default async function PostPage({ params }: {
  params: Promise<{ slug: string }>;
}) {
  const { slug } = await params;
  const post = await fetchPostBySlug(slug);
  if (!post) notFound();

  return (
    <article>
      <h1>{post.title}</h1>
      <Content
        content={post.content}
        contentCssClasses={post.contentCssClasses}
        parsers={[nextImageParser()]}
      />
    </article>
  );
}
5개의 파일, 2개의 도메인, 1개의 npx. 편집자는 결코 이동하지 않습니다; 납품 층은 그것의 밑에 변화합니다.
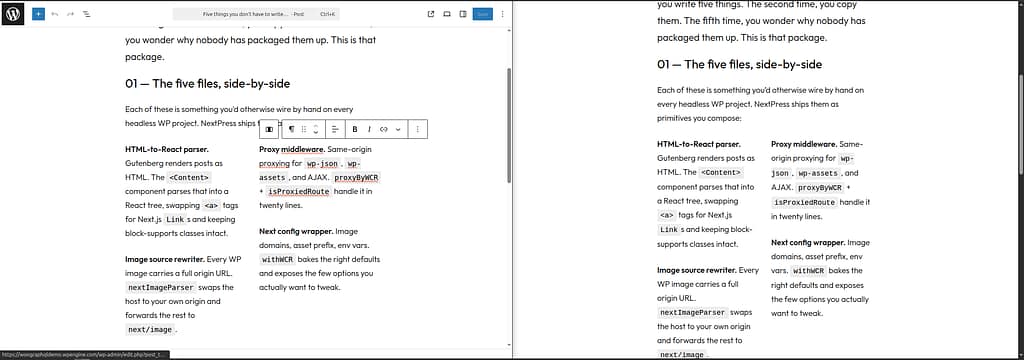
이름 * <Content> 당신을 위해
포스트 바디는 WordPress 블록 HTML의 문자열입니다. 그것을 붙여넣기 dangerouslySetInnerHTML 그것을 렌더링하지만 프로세스에서 세 가지를 잃게됩니다. <Content> 핸들:
- HTML을 React 트리에 퍼팅합니다. 모든 것
<p>·<figure>·<blockquote>실제 React 노드는 파서로 오버라이드 할 수 있습니다. — 그게 어떻게nextImageParser관련 상품<img>제품정보next/imageZero Markup은 업스트림을 변경합니다. - 각 블록의 CSS를 응답으로 끌어냅니다. Block-supports 인라인 규칙, theme.json 팔레트 토큰, 플러그인 주입 시트 – 그들은 페이지와 인라인을 발송 그래서 수화 후 레이아웃 이동이 없습니다.
- 뚱 베어
<script type="application/json">blobs 부정 행위. 대화형 블록(motion Engine, accordions, view-script)가 서로 다른 API 라운드 트립이 없는 클라이언트 측 코드에 대한 모든 것 입니다.
다음 이동
동일한 6개의 파일은 약간 명백한 방향에서 확장합니다. 카테고리와 태그 하나 더 WPGraphQL where 로그인 fetchPosts. 댓글과 같은 쿼리에 따라 질 타기. 검색 결과 search 인수 및 배송 /search?q=... 다른 20 분의 노선.
전체 소스에 프로젝트. 패키지 문서 /docs/nextpress의 경우. WordPress를 유지하고 Next.js를 배달 레이어로 추가 한 뒤에 건축 왜 원하는 경우, 그 조각이 오고 있습니다.
Leave a Reply