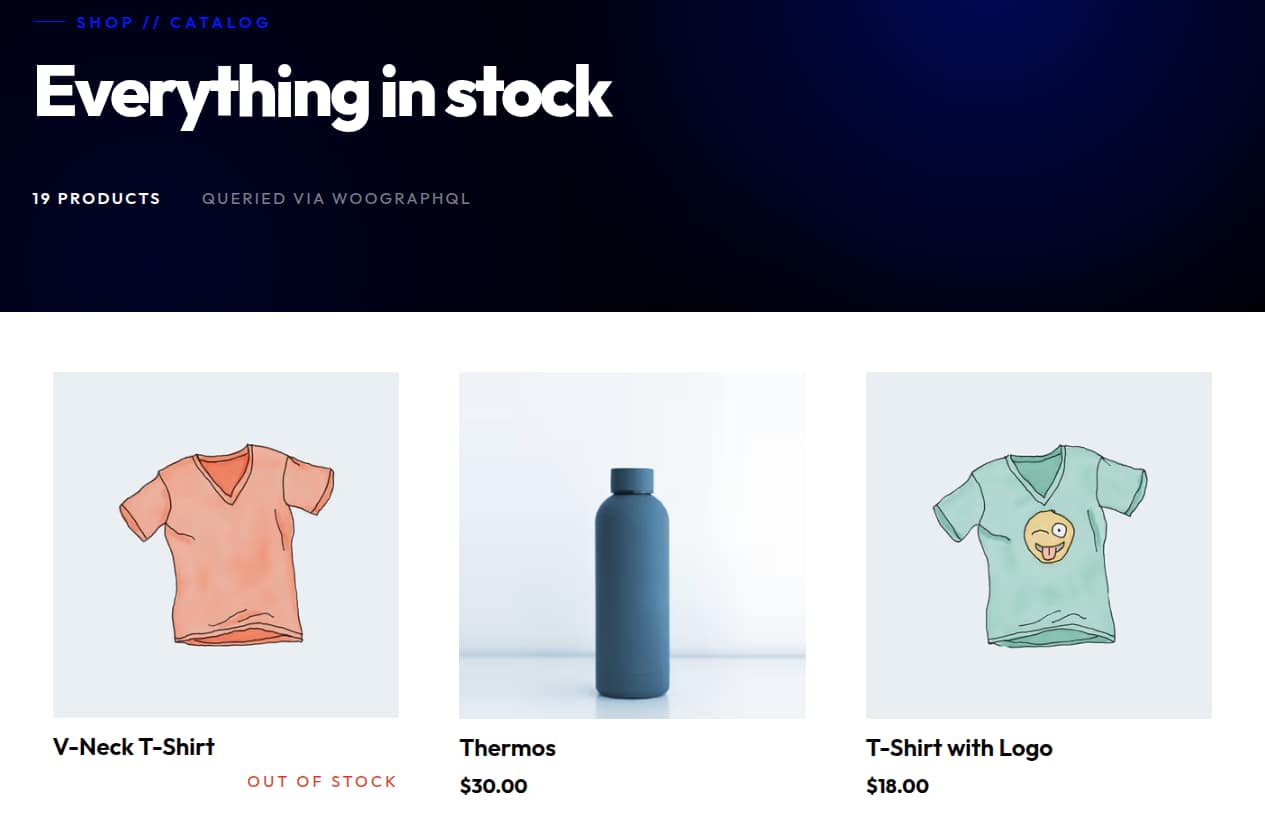
블로그 작업이 있습니다. 지금 저장을 추가합니다. 이 walkthrough 픽업 정확히 어디 headless 블로그 튜토리얼 잎 떨어져. 두 개의 새로운 WordPress 플러그인, 루트 그룹은 WP 렌더링 페이지가 자신의 루트 레이아웃을 얻을 수 있도록 분할, 단일 헤더 – Cart-Token — WooCommerce의 Store API에 Next.js 세션을 브리징합니다. 블로그를 게재하는 동일한 앱은 현재 매장 앞을 제공하고 있으며, 장바구니와 체크 아웃은 이미 설치되어 있습니다.
비교 repo: github.com/AxisTaylor/nextpress-woographql-quickstart에 대 한. 그것은 nextpress-quickstart 블로그 튜토리얼에서이 게시물에 적용되는 모든 것을 사용하여 top — clone it, run npm install && npm run dev, 당신은에 대하여 전체적인 교류 달리기가 있습니다 woographqldemo.wpengine.com·
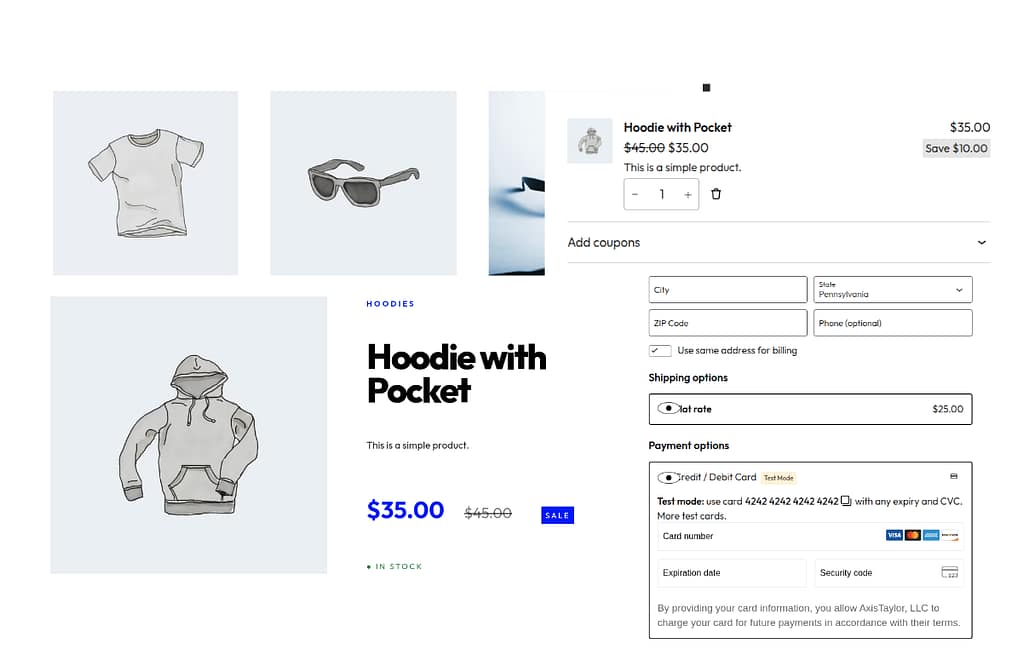
누구에게도
기존 Next.js 앱이 있습니다. — yours, 또는 블로그 튜토리얼을 따르는 것. 당신은 상거래를 원합니다 : 제품, 카트, 체크 아웃, 지불, 재고, 세금, 배송, 모두. 당신은 찰상에서 마지막 여섯 가지 것들을 쓰는 것에 관심이 없습니다. WooCommerce는 ~5 백만 개의 라이브 상점을 실행하고 확장 시장은 모든 오픈 소스 상거래 플랫폼에서 가장 큰 것입니다. 블로그에 내장 된 헤드리스 WordPress 설정은 헤더리스 WooCommerce 설정 – 동일한 백엔드, 동일한 프록시, 두 개의 플러그인 및 레이아웃 복원.
주의 사항 : 아무 것도 없습니다.
이 튜토리얼은 게스트 전용 상점 정면. 로그인 페이지, 계정 대시보드 없음, JWT 새로 고침 루프 없음. 더 보기 Cart-Token WooCommerce 손 뒤 자체 세션 식별자 – 게스트는 검색 할 수 있으며 카트에 추가, 체크 아웃, 아무것도 자신의 청구 이메일과 주문 키와 그들의 확인. 그것은 대부분의 storefronts에 대한 전체 행복 경로를 다룹니다. 인증된 고객 계정을 원한다면, 와이어 업 RSS 피드 또는 RSS 피드 별도로 – 그것은 그것을 방해하지 않고 카트 토큰 흐름과 함께 플러그를 설계.
블로그 튜토리얼에서 어떤 변경 사항
- 두 개의 새로운 WP 플러그인 : WooCommerce 및 WooCommerce에 대한 WPGraphQL·
- 루트 그룹 분할. 기타 제품
app/layout.tsx. 앱 경로 이동app/(main)/자신의 루트 레이아웃. WP 렌더링 경로 이동 (cart, 체크 아웃, 블로그) intoapp/(wordpress-pages)/별도의 루트 레이아웃으로<WPHead />내 계정<head>. Importmaps 및 스크립트 모듈은 WC 체크 아웃 블록에 의해 방출 된 문서에 가져올 때 올바르게 해결<head>, 그리고 배열된 배치는 외부 뿌리 배치가 소유하는 경우에 그것을 둘 수 없습니다<html>· - Middleware는 세션을 브릿지합니다. 자세히보기
sessionToken모든 proxied WP REST / AJAX 요청에 대한 쿠키, 첨부Cart-Token머리. 모든 회전 캡처Cart-Token응답 및 persist에 다음 요청은 동일한 WC 세션에 머물. - Server-side GraphQL fetches는 동일한 헤더를 전달합니다. 둘 다
fetchPageByUri그리고fetchAssetsByUri자주 묻는 질문Cart-Token. 그것을 건너fetchAssetsByUri단일 날카로운 gotcha – 빈 카트에 대한 WC 체크 아웃 블록 서버 렌더링 및 빵"Cannot create order from empty cart"오류로wcSettings.checkoutData, 페이지는 영구적으로 붙어 있습니다. - 광택 제품 페이지 Variable Products에 대한 변형 선택기 ( 속성에 의해 일치)
name, 아니label– 지역 속성에 대한 미묘한 gotcha가 있습니다. - 서버 작업을 통해 고객 주문 조회.
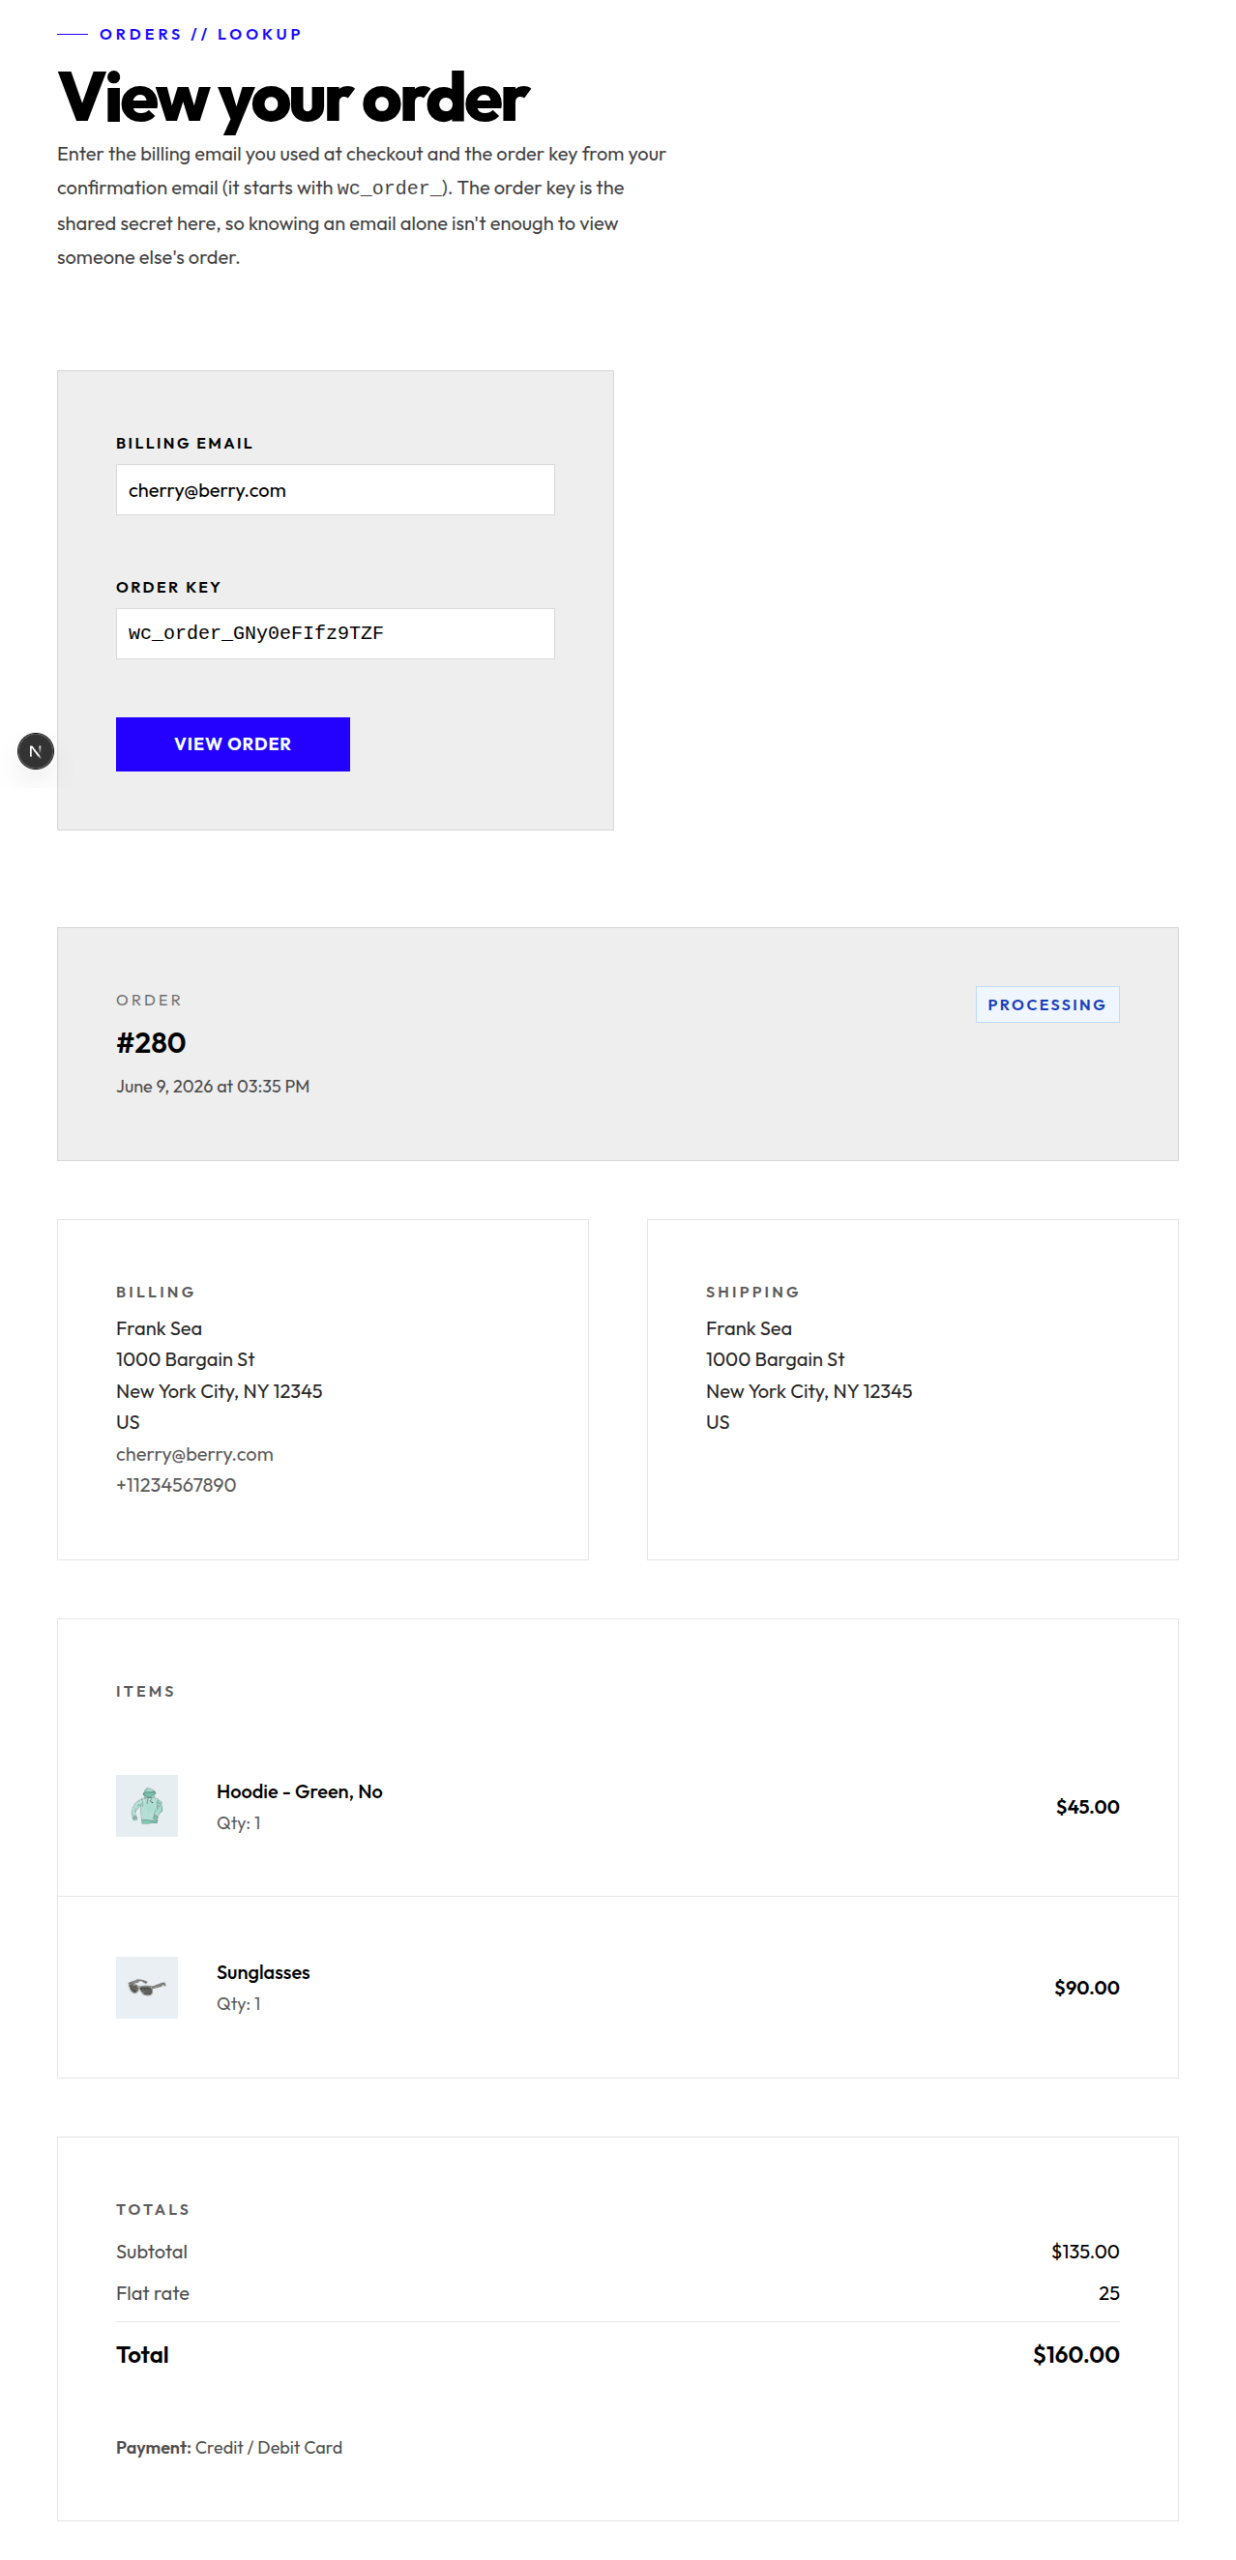
/view-order결제 이메일 + 주문 키가 필요하며 주문을 렌더링합니다. 서버 동작은 현재 이메일에 바인딩Cart-Token세션updateCustomer, 그 때 순서 열쇠에 의하여 순서 연결이 좁습니다. 신청 암호 없음, 상점 관리 계정 없음. - 자동 영수증
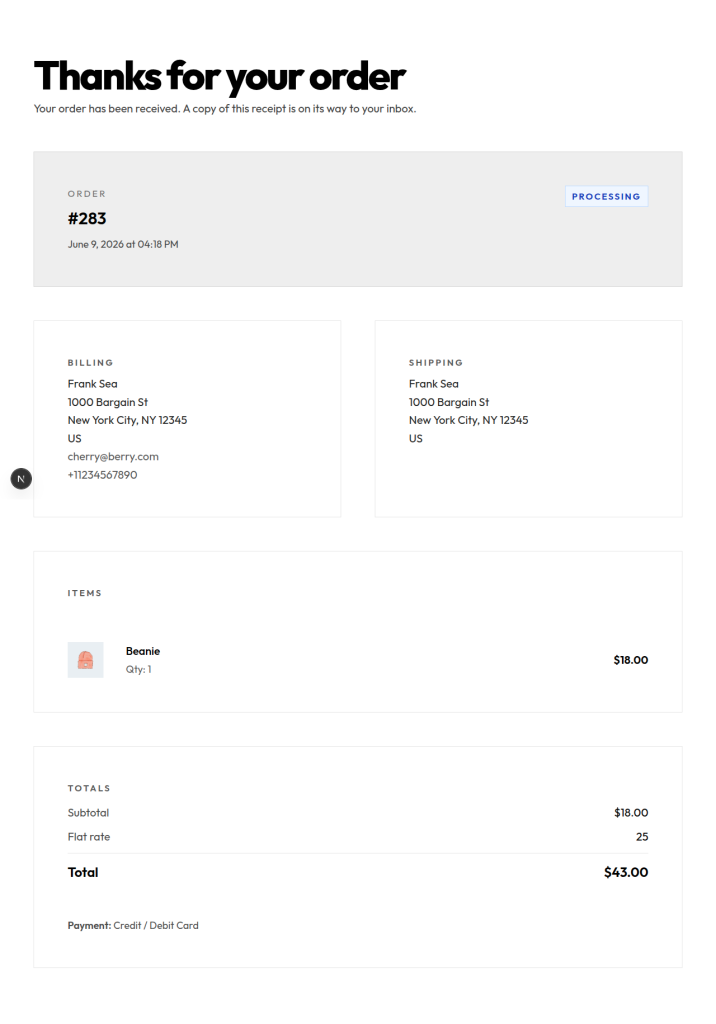
/checkout/order-received/[id]· 클라이언트 구성 요소는 WC 체크 아웃 블록에서 쿠키로 청구 이메일을 캡처합니다. 영수증 페이지는 쿠키 +를 읽습니다?key=URL에서 동일한 서버 동작을 통해 순서를 봅니다. – 입력할 양식이 없습니다. - 제품 리뷰 작은를 통해 타전
/api/product/reviewWooGraphQL의 호출 경로writeReview카트 토큰이 전달된 돌연변이.
단계 1 – 두 WP 플러그인 설치
- 우커머스 — 플러그인 디렉토리에서. 설정 마법사를 실행, 지불에 대한 스트립 테스트에 드롭, 몇 가지 데모 제품을 추가 그래서 쿼리하는 뭔가. 제품정보
/cart·/checkout블록 템플릿을 사용 (과태 Woo 8.3 이후) 오히려 레거시 단축 코드보다 – 그 다음Press는 프록시입니다. - WooCommerce에 대한 WPGraphQL – 제품, 카트, 고객 및 주문 유형 추가
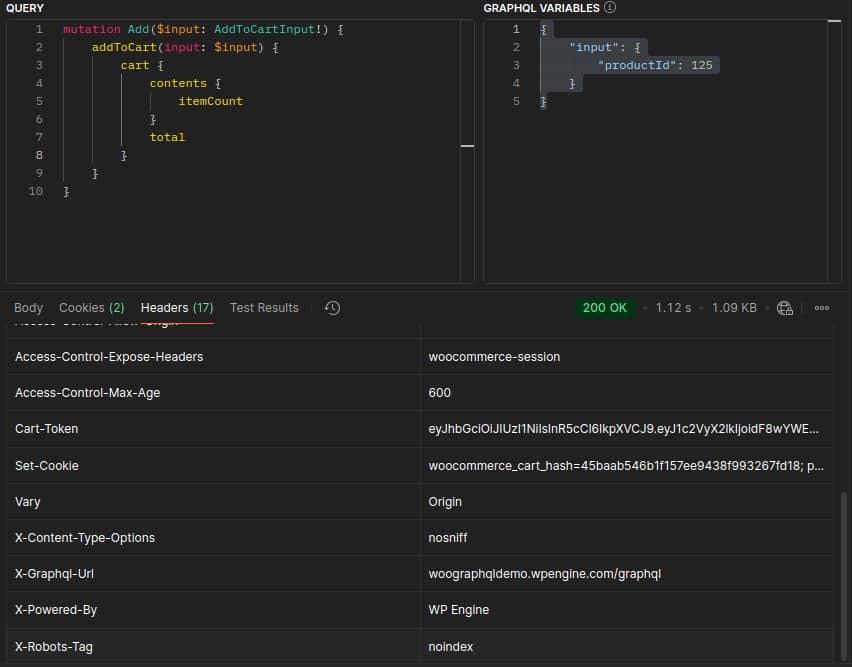
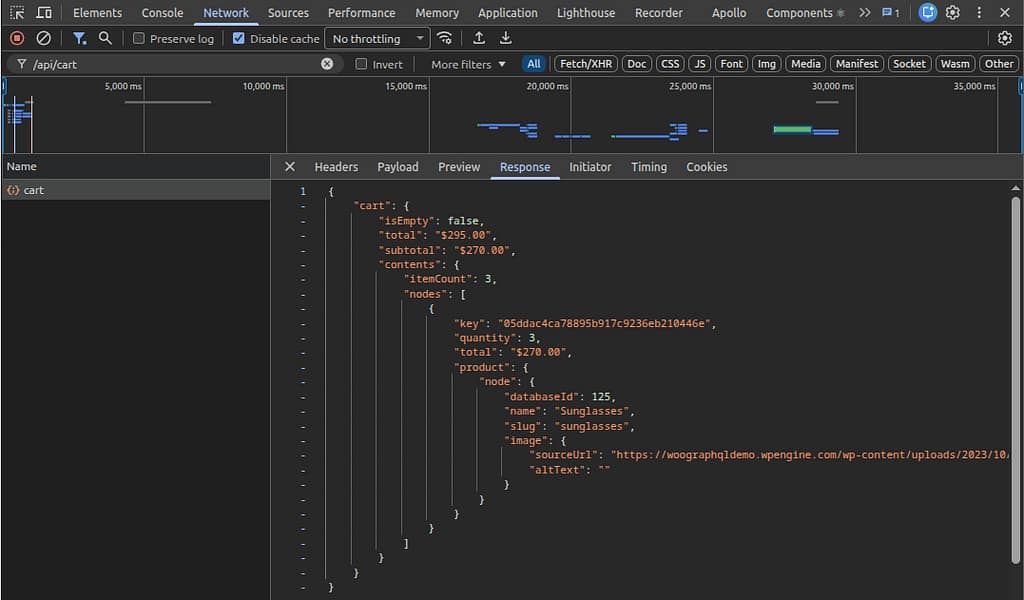
/graphql. Postman에서 검증 (또는 응답 헤더가 표면이있는 HTTP 클라이언트 – GraphiQL은 그들을 숨깁니다)addToCart현실에 대한 mutationproductId없음Cart-Token자주 묻는 질문 WP는 신선한 게스트 세션을 만들고 JWT를 반환합니다.Cart-Token응답 헤더.
mutation BootGuestSession {
  addToCart(input: { productId: 13, quantity: 1 }) {
    cart {
      contents { itemCount }
      total
    }
  }
}
더 보기 Cart-Token 헤드러는 카트와 세션에서만 배송됩니다. 풋볼 — — addToCart· updateItemQuantity· removeItemsFromCart· applyCoupon, 그리고 친구. 자주 묻는 질문 /graphql GraphiQL은 이 검증 단계가 Postman을 사용하는 이유 인 응답 헤더를 표시하지 않습니다. 한 번 미들웨어가 번창한 응답에 대한 헤더가 새로운 가치를 주장 sessionToken 쿠키 및 모든 후속 요청 – 체크 아웃 블록에서 REST 통화, 다음 GraphQL 쿼리 – 그것에 타고.
단계 2 – 루트 그룹 분할
이것은 단 하나 가장 큰 구조상 변화입니다. 기타 제품 app/layout.tsx. 2개의 최고 수준 노선 그룹의 밑에 각 노선을 이동하십시오, 그것의 자신의 뿌리 배치로 각각:
src/app/
├── api/
│   ├── cart/route.ts             ← cart mutations (server-only)
│   └── product/review/route.ts   ← review submission (server-only)
├── globals.css
├── (main)/                       ← in-app routes
│   ├── layout.tsx                ← <html>/<body> for the catalog + lookup surface
│   ├── page.tsx                  ← /
│   ├── products/
│   │   ├── page.tsx              ← /products
│   │   └── [slug]/page.tsx       ← /products/[slug] (Simple + Variable)
│   └── view-order/page.tsx       ← /view-order (guest order lookup)
└── (wordpress-pages)/            ← WP-rendered routes
    ├── layout.tsx                ← <html><head><WPHead /></head><body>
    ├── cart/page.tsx             ← /cart
    ├── checkout/
    │   ├── page.tsx              ← /checkout (+ CheckoutEmailCapture)
    │   └── order-received/[id]/page.tsx  ← auto-receipt
    └── blog/
        ├── page.tsx
        └── [slug]/page.tsx
왜? Next.js만 허용 <html> · <body> 루트 레이아웃. 없음 app/layout.tsx, 각 최고 수준 노선 그룹은 그것의 자신의 뿌리가 됩니다. 더 보기 (wordpress-pages) 뿌리는 둘 수 있습니다 <WPHead /> 직접 내부 <head> — 어디 <script type="importmap"> WC의 모듈형 스크립트에 대한 방출 제품정보 한국어 단일 루트 아래에 배열된 레이아웃을 시도하고 importmap이 종료됩니다. <body>; 모듈 스크립트는 다음 해결 실패 @wordpress/plugins 그리고 전체 카트 블록 트리는 init에 던져.
import { headers } from 'next/headers';
import { WPHead, WPFooter } from '@axistaylor/nextpress';
import { fetchAssetsByUri, fetchGlobalStyles } from '@/lib/wp';

export const dynamic = 'force-dynamic';

const CRITICAL_STYLESHEETS = [
  'wp-block-library', 'wp-block-library-theme', 'global-styles',
  'classic-theme-styles', 'wc-blocks-style', 'wc-blocks-vendors-style',
];

export default async function WordPressLayout({ children }) {
  const uri = (await headers()).get('x-uri') || '/';
  const [{ scripts, stylesheets, importMap }, globalStyles] = await Promise.all([
    fetchAssetsByUri(uri),
    fetchGlobalStyles(),
  ]);

  return (
    <html lang="en">
      <head>
        <WPHead
          scripts={scripts}
          stylesheets={stylesheets}
          globalStyles={globalStyles}
          importMap={importMap}
          pathname={uri}
          criticalHandles={CRITICAL_STYLESHEETS}
        />
      </head>
      <body>
        <main>{children}</main>
        <WPFooter scripts={scripts} pathname={uri} />
      </body>
    </html>
  );
}
3 단계 – Middleware는 카트 토큰을 교량
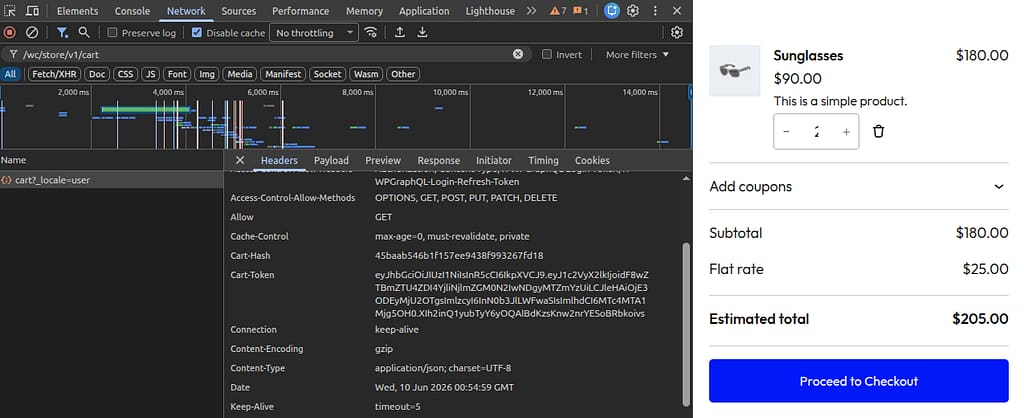
(주) src/proxy.ts 모든 proxied WP REST / AJAX 요청에 카트 토큰을 첨부하려면 회전 된 토큰 WP가 응답을 다시 작성합니다. 카트 차단 frontend fetches /wc/store/v1/cart 브라우저에서, 그것은 당신의 NextPress 프록시를 통해 간다 — 그리고 그 프록시는 번역해야 sessionToken 관련 기사 Cart-Token 헤더 WooCommerce 기대. WooCommerce는 때때로 토큰을 회전합니다 (카트 뮤테이션 후, 쿠폰 적용, 기타); 응답 헤더는 새로운 가치를 신호하는 방법입니다.
import { NextResponse, NextRequest } from 'next/server';
import {
  proxyByWCR, isProxiedRoute,
  isWCAjaxRequest, isWPAjaxRequest, isWPRestRequest,
} from '@axistaylor/nextpress/proxyByWCR';

export const proxy = async (request: NextRequest) => {
  const pathname = request.nextUrl.pathname;

  // 1. 각 proxied REST/AJAX에 카트 토큰을 앞으로
  //  브라우저 측 WC 블록 토지의 실제 카트 세션.
  if (
    isProxiedRoute(pathname) &&
    (isWPAjaxRequest(pathname) || isWCAjaxRequest(pathname) || isWPRestRequest(pathname))
  ) {
    const sessionToken = request.cookies.get('sessionToken')?.value;
    if (sessionToken) request.headers.set('Cart-Token', sessionToken);
  }

  // 2. 요청을 프록시, 다음 모든 회전 카트 토큰 WP 쓰기 캡처
  //  응답을 다시하고 sessionToken 쿠키로 persist.
  if (isProxiedRoute(pathname)) {
    const response = await proxyByWCR(request);
    const rotated = response.headers.get('Cart-Token');
    if (rotated) {
      const next = new NextResponse(response.body, {
        status: response.status,
        statusText: response.statusText,
        headers: response.headers,
      });
      next.cookies.set({
        name: 'sessionToken',
        value: rotated,
        path: '/',
        maxAge: 30 * 24 * 60 * 60,
        secure: process.env.NODE_ENV === 'production',
        httpOnly: true,
        sameSite: 'lax',
      });
      return next;
    }
    return response;
  }

  const headers = new Headers(request.headers);
  headers.set('x-uri', pathname);
  return NextResponse.next({ request: { headers } });
};

export const config = {
  matcher: [
    '/atx/:instance/proxiee',
    '/atx/:instance/wp',
    '/atx/:instance/wc',
    '/atx/:instance/wp-internal-assets/:path*',
    '/atx/:instance/wp-assets/:path*',
    '/atx/:instance/wp-json/:path*',
    '/((?!_next|api|favicon.ico|sw.js|.*\\.).*)',
  ],
};
단계 4 – 토큰을 전달하는 GraphQL 도우미
두 명의 도움자 src/lib/wp.ts WPGraphQL에 이야기 : gqlWithSession 카트 세션이 필요한 쿼리에 대해, 그리고 fetchAssetsByUri / 한국어 fetchPageByUri 둘 다 그것을 사용합니다. 이 모두는 카트 토큰을 전달합니다. – 두 번째는 gotcha입니다.
import 'server-only';
import { cookies } from 'next/headers';

const endpoint = process.env.GRAPHQL_ENDPOINT as string;

interface FetchOptions { sessionToken?: string | null }

export async function gqlWithSession<T>(
  query: string,
  variables: Record<string, unknown> | undefined,
  options: FetchOptions = {},
) {
  const headers: Record<string, string> = { 'Content-Type': 'application/json' };
  if (options.sessionToken) headers['Cart-Token'] = `${options.sessionToken}`;

  const res = await fetch(endpoint, {
    method: 'POST',
    headers,
    body: JSON.stringify({ query, variables }),
    cache: 'no-store',
  });
  const json = await res.json();
  return { data: json.data ?? null, errors: json.errors };
}

// 중요한: 앞으로 손수레 토큰 여기. AssetByUri 해결자
// 방아쇠 WP 측 스크립트 enqueueing, 이는 WC의 실행
// hydrate data from api request 에 체크 아웃 블록. 없음
// 우두머리, wc()->cart는 그 요청을 위해 비쌉니다, hydrate는 생성합니다
// "비어 있는 카트에서 순서를 만들 수 없습니다", 그리고 그 오류는 안으로 발송합니다
// wcSettings.checkoutData → 체크 아웃 블록의 hasCheckoutError
// 문은 영구적으로 불립니다.
export async function fetchAssetsByUri(uri: string) {
  const c = await cookies();
  const sessionToken = c.get('sessionToken')?.value ?? null;

  const { data } = await gqlWithSession<{ assetsByUri: any }>(
    `query ($uri: String!) {
       assetsByUri(uri: $uri) {
         importMap(scheme: RELATIVE) { name path }
         enqueuedStylesheets(first: 500) {
           nodes { handle src version before after }
         }
         enqueuedScripts(first: 500) {
           nodes { handle src strategy version group location type before after
                   dependencies { handle } }
         }
       }
     }`,
    { uri },
    { sessionToken },
  );
  const a = data?.assetsByUri;
  return a
    ? { scripts: a.enqueuedScripts.nodes, stylesheets: a.enqueuedStylesheets.nodes, importMap: a.importMap ?? [] }
    : { scripts: [], stylesheets: [], importMap: [] };
}

export async function fetchPageByUri(uri: string) {
  const c = await cookies();
  const sessionToken = c.get('sessionToken')?.value ?? null;

  const { data } = await gqlWithSession<{ page: any }>(
    `query ($uri: ID!) {
       page(id: $uri, idType: URI) { id title content contentCssClasses }
     }`,
    { uri },
    { sessionToken },
  );
  return data?.page ?? null;
}
그 의견 fetchAssetsByUri 장식이 아닙니다 – 전체 이유입니다. /checkout 당신이 그것을 잊으면 조용히 실패합니다. WPGraphQL은 미세, 브라우저의 REST 호출 작업, 카트 REST는 올바른 항목을 반환 – 그리고 페이지는 여전히 WC 블록의 서버 측 사전로드 된 데이터가 빈 카트 세션에 대해 생성했기 때문에 빈 카트 오류를 렌더링합니다. 토큰 전달 모두 보기 서버 측 GraphQL fetches는 간격을 닫습니다.
단계 5 – API 경로로 카트
add-to-cart, update-quantity, remove-from-cart – 모든 흐름을 통해 /api/cart 핸들러. 경로 읽기 sessionToken 쿠키에서 WPGraphQL mutation을 실행합니다. Cart-Token 연결하고 업데이트된 카트를 반환합니다. Step 3의 미들웨어는 어떤 회전 토큰을 주장하는 데 도움이됩니다.
import { NextRequest, NextResponse } from 'next/server';
import { cookies } from 'next/headers';
import { gqlWithSession } from '@/lib/wp';

const COOKIE_OPTS = { httpOnly: true, secure: true, sameSite: 'lax' as const, path: '/' };

async function readSession() {
  return { sessionToken: (await cookies()).get('sessionToken')?.value ?? null };
}

interface CartActionPayload {
  action: 'add' | 'update' | 'remove' | 'clear' | 'applyCoupon' | 'removeCoupon';
  productId?: number;
  variationId?: number;
  variation?: { attributeName: string; attributeValue: string }[];
  quantity?: number;
  key?: string;
  code?: string;
}

export async function POST(req: NextRequest) {
  const payload = (await req.json()) as CartActionPayload;
  const auth = await readSession();

  if (payload.action === 'add') {
    const result = await gqlWithSession<{ addToCart: { cart: unknown } }>(
      `mutation Add($input: AddToCartInput!) {
         addToCart(input: $input) { cart { contents { itemCount } total } }
       }`,
      { input: {
        productId: payload.productId,
        variationId: payload.variationId,
        variation: payload.variation,  // local-attribute variations need this
        quantity: payload.quantity ?? 1,
      } },
      auth,
    );
    if (result.errors?.length) {
      return NextResponse.json({ error: result.errors[0].message }, { status: 400 });
    }
    return NextResponse.json({ cart: result.data?.addToCart?.cart ?? null });
  }

  // ...업데이트 / 제거 / applyCoupon / 명확한 같은 패턴을 따르십시오.
}
이름 * variation 입력에 배열. Variable-product add-to-cart는 글로벌 및 로컬 속성을 혼합하는 변형에 대해 필요합니다. 단계 7.
단계 6 – 광택 제품 페이지
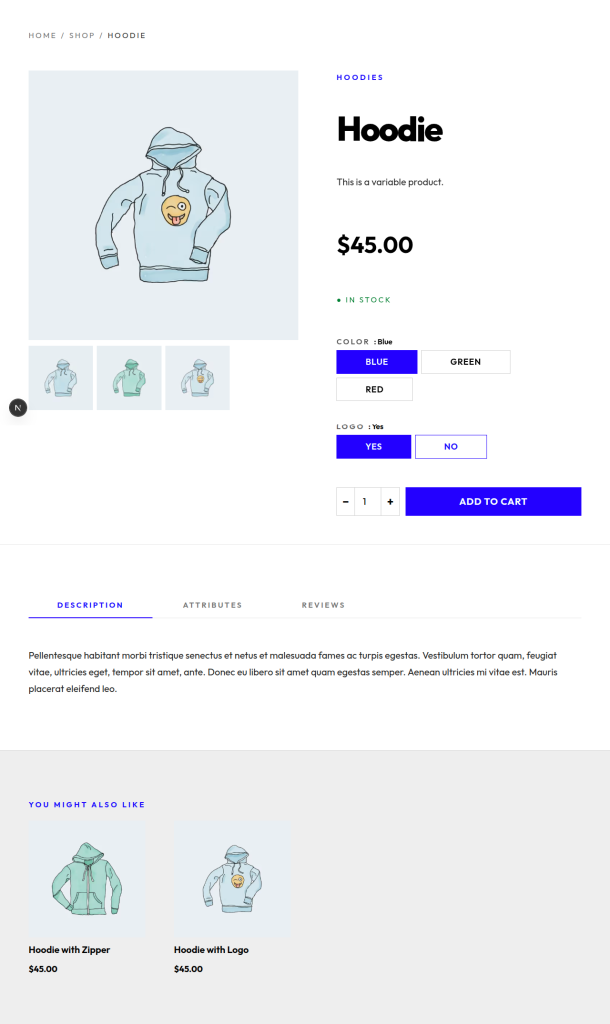
제품 페이지는 구매자로 브라우저를 변환, 그래서 이것은 당신이 진짜 디자인 시간을 보내는 곳이다. 서버 구성 요소, ISR-cached, 전체보기에 대한 단일 GraphQL 쿼리 : 제목, 영웅 이미지, 갤러리 (각 이미지의 자연적 측면 비율을 촬영 mediaDetails), 가격 + 판매 배지, 재고 배지, 짧은 + 긴 설명, 관련 제품, 빵 부스러기 및 Google 쇼핑을위한 제품 schema.org JSON-LD. 페이지에 파견 __typename 두 개의 영웅 구성 요소 중 하나. 모두 렌더링 mobile-first – 대부분의 storefront 트래픽은 모바일이며 아래 스크린 샷은 작은 뷰 포트보기입니다.
import { notFound } from 'next/navigation';
import { fetchProductBySlug, fetchProductSlugs } from '@/lib/wp';
import { SimpleProductHero } from '@/components/SimpleProductHero';
import { VariableProductHero } from '@/components/VariableProductHero';
import { ProductTabs } from '@/components/ProductTabs';

export const revalidate = 300;

export async function generateStaticParams() {
  return (await fetchProductSlugs()).map((slug) => ({ slug }));
}

export default async function ProductPage({ params }) {
  const { slug } = await params;
  const product = await fetchProductBySlug(slug);
  if (!product) notFound();

  return (
    <>
      <article className="grid lg:grid-cols-[1.1fr_1fr] gap-12 max-w-wide mx-auto px-x-small py-medium">
        {product.__typename === 'VariableProduct'
          ? <VariableProductHero product={product} />
          : <SimpleProductHero product={product} />}
      </article>
      <ProductTabs product={product} />
    </>
  );
}
Step 7 – 가변 제품에 대한 변형
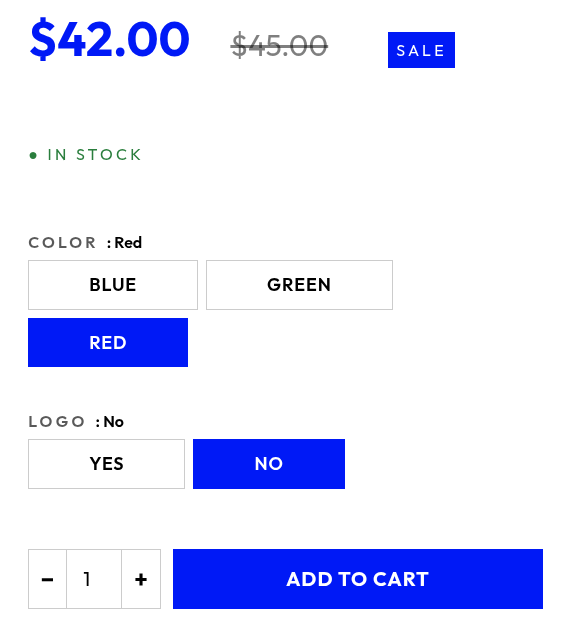
VariableProductHero 속성 선택 상태를 소유하고 가격을 들어 올리는 클라이언트 구성 요소, 이미지, 재고 배지를 일치 변형. 2개의 작은 그러나 짐 방위 세부사항:
- 으로 일치
name, 아니label· 글로벌 속성 (taxonomy-backed:pa_color·pa_size), 모두name·label관련 기사ProductAttribute·VariationAttribute. 지역 속성 (제품, 세금 별도)의 경우,ProductAttribute.label인간의 형태 (“로고”) 하지만VariationAttribute.label·sanitize_title()’d (“로고”). 두 개의label필드는 비교할 수 없습니다.name바로가기sanitize_title()양쪽에, 그래서 항상 동의한다 – 일치name· - 이름 *
variationadd-to-cart에 배열. 고객의 선택이 현실에 대응할 때variationId, 둘 다 보내 – 속성이 지구 또는 지역인지 여부에 관계없이 WooGraphQL의 카트 아이템을 핀으로합니다.
// VariationAttribute.label는 LOCAL 속성에 대한 sanitize title()입니다.
// (예 : "로고" → "로고")하지만 ProductAttribute. 상표는 인간적인 모양입니다
// ("로고"). 둘 다 sanitize title()가 BOTH에 드러낸다
// `name`, not by `label`.
export interface VariationAttrSel { name: string; value: string }

export function variationMatches(
  variationAttrs: { name: string; value: string }[],
  selection: VariationAttrSel[],
): boolean {
  if (variationAttrs.length === 0) return false;
  return variationAttrs.every((va) => {
    if (va.value === null) return true; // "any" — accepts everything
    const sel = selection.find((s) => s.name === va.name);
    return sel?.value === va.value;
  });
}

export function findMatchingVariation<V extends {
  attributes: { nodes: { name: string; value: string }[] };
}>(
  variations: V[],
  selection: VariationAttrSel[],
): V | undefined {
  return variations.find((v) =>
    variationMatches(v.attributes.nodes, selection));
}'use client';
import { useState } from 'react';
import { findMatchingVariation } from '@/lib/variation-helpers';
import { AddToCartButton } from './AddToCartButton';
export function VariableProductHero({ product }) {
const [selection, setSelection] = useState({});
const current = findMatchingVariation(product.variations.nodes,
Object.entries(selection).map(([name, value]) => ({ name, value })));
const price = current?.price ?? product.price;
const image = current?.image ?? product.image;
const inStock = (current?.stockStatus ?? product.stockStatus) !== 'OUT_OF_STOCK';
const variationPayload = Object.entries(selection)
.map(([attributeName, attributeValue]) => ({ attributeName, attributeValue }));
return (
<>
<ProductGallery image={image} gallery={product.galleryImages.nodes} />
<ProductInfo price={price} inStock={inStock}>
{product.attributes.nodes.map((attr) => (
<AttributePicker
key={attr.name}
attribute={attr}
value={selection[attr.name]}
onChange={(v) => setSelection((s) => ({ ...s, [attr.name]: v }))}
/>
))}
<AddToCartButton
productId={product.databaseId}
variationId={current?.databaseId}
variation={variationPayload}
inStock={inStock && !!current}
/>
</ProductInfo>
</>
);
}
단계 8 – 다음을 통해 카트 및 체크 아웃Press 프록시
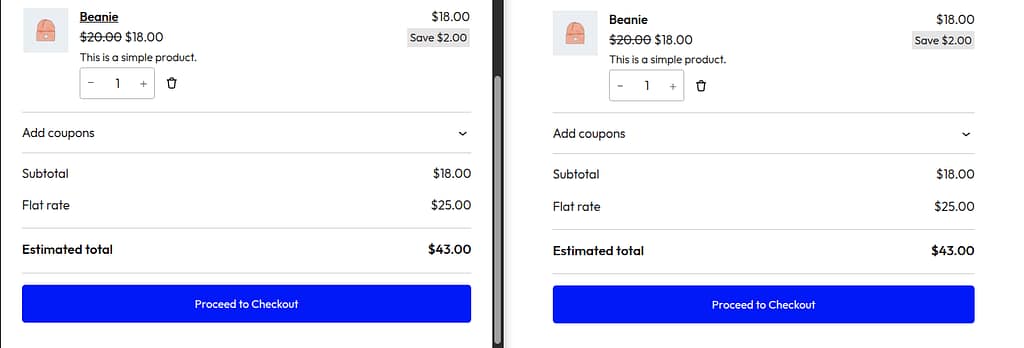
2개의 노선, 각 12의 선. 그들은 아래에 살고 (wordpress-pages) 그래서 그들은 단계 2에서 WP 렌더링 레이아웃을 선택합니다 :
import { notFound } from 'next/navigation';
import { Content, nextImageParser } from '@axistaylor/nextpress';
import { fetchPageByUri } from '@/lib/wp';

export default async function CartPage() {
  const page = await fetchPageByUri('/cart');
  if (!page) notFound();
  return (
    <article>
      <Content
        content={page.content}
        contentCssClasses={page.contentCssClasses}
        parsers={[nextImageParser()]}
      />
    </article>
  );
}
더 보기 (wordpress-pages) layout fetches 자산 그래프 (with Cart-Token!), 페이지는 WC 카트 블록 마크 업을 렌더링하고, 카트 블록 프런트 엔드 스크립트는 수화에 걸립니다 – 같은 사용 Cart-Token 미들웨어 다리를 통해. 동일한 모양 /checkout/page.tsx; 블로그 경로에 대한 동일한 모양.
Step 9 – 서버 작업을 통해 고객 주문 조회
일단 순서가 존재하면, 고객은 그것을 보는 방법 필요로 합니다. 표준 WooCommerce 흐름에 영수증을 넣어 /checkout/order-received/[id], 그러나 그것은 또한 반복 방문을 위한 수동 조회 페이지를 필요로 합니다, 잃은 확인 탭, 및 이메일 후속 연결. /view-order 그 페이지 — 서버 구성 요소와 형태, 서버 작업에 게시.
행동은 다음과 같습니다. updateCustomer 없음 id 현재에 부착된 고객 Cart-Token 세션. 설정하기 billing.email 이메일에 그 세션을 바인딩; 고객의 orders 연결은 모든 주문이 해당 주소에 대해 반환합니다. – 게스트 주문 포함, 이는 전체 포인트입니다. 행동은 좁은 orderKey, 이는 공유 비밀으로 작동: 혼자 이메일을 아는 것은 다른 사람의 순서에 충분하지 않습니다.
'use server';
import { cookies } from 'next/headers';
import { revalidatePath } from 'next/cache';
import { gqlWithSession, type Order, ORDER_FRAGMENT } from '@/lib/wp';
import { LOOKUP_COOKIE, ERROR_COOKIE } from '@/utils/constants';

const FIND_ORDER_MUTATION = /* GraphQL */ `
  ${ORDER_FRAGMENT}
  mutation BindEmailAndFindOrder($input: UpdateCustomerInput!) {
    updateCustomer(input: $input) {
      customer {
        orders(first: 100) {
          nodes { ...OrderFields }
        }
      }
    }
  }
`;

// 런닝 업데이트고객은 'id`없이 뮤테이션을 적용합니다.
// 현재 Cart-Token 세션에 첨부된 고객. 설정하기
// billing.email은 이메일에 세션을 바인딩; 고객의
// 주문 연결 그런 다음 모든 주문이 반환됩니다.
// 주소 - 게스트 주문 포함. orderKey에 의해 좁은,
// 공유 비밀로 행동: 혼자 이메일을 아는 것은 충분하지 않다
// 다른 사람의 순서.
//
// Server-action invocations를 통해서만 실행되므로 GraphQL
// endpoint와 고객 바인딩 semantics는 결코 도달하지 않습니다
// 고객. 튜토리얼 리더는 애플리케이션 암호가 필요하지 않습니다. — the
// Session's own Cart-Token은 뮤테이션을 인증합니다.
export async function lookupOrder(
  email: string,
  orderKey: string,
): Promise<{ order?: Order; error?: string }> {
  if (!email?.trim() || !orderKey?.trim()) {
    return { error: 'Email and order key are required.' };
  }

  const sessionToken = (await cookies()).get('sessionToken')?.value ?? null;
  const result = await gqlWithSession<{
    updateCustomer: { customer: { orders: { nodes: Order[] } } | null } | null;
  }>(
    FIND_ORDER_MUTATION,
    { input: { billing: { email: email.trim() } } },
    { sessionToken },
  );

  if (result.errors?.length) return { error: result.errors[0].message };
  const orders = result.data?.updateCustomer?.customer?.orders?.nodes ?? [];
  const match = orders.find((o) => o.orderKey === orderKey.trim());
  if (!match) return { error: 'No order found for that email and order key.' };
  return { order: match };
}

export async function lookupOrderFormAction(formData: FormData): Promise<void> {
  const email = String(formData.get('email') ?? '').trim();
  const orderKey = String(formData.get('orderKey') ?? '').trim();
  const result = await lookupOrder(email, orderKey);

  const jar = await cookies();
  if (result.error || !result.order) {
    jar.set(ERROR_COOKIE, result.error ?? 'Order not found.',
      { path: '/', sameSite: 'lax', maxAge: 60 });
    jar.delete(LOOKUP_COOKIE);
  } else {
    jar.set(LOOKUP_COOKIE, JSON.stringify({ email, orderKey }), {
      httpOnly: true,
      secure: process.env.NODE_ENV === 'production',
      sameSite: 'lax', path: '/', maxAge: 60 * 60 * 24,
    });
    jar.delete(ERROR_COOKIE);
  }
  revalidatePath('/view-order');
}
이 피는 무엇: 상점 관리 신청 암호를 데모로 손으로 구출. 튜토리얼 리더는 하나가없고, “here, admin credentials를 붙여 넣기 .env“은 책임지지 않습니다. Cart-Token-as-shared-secret 패턴은 기존 세션 모델 내에서 모든 것을 유지합니다.
단계 10 – /checkout/order-received의 자동 영수증
WooCommerce가 성공적인 체크 아웃 후 고객을 리디렉션 할 때 URL은 /checkout/order-received/[id]?key=wc_order_…· key 순서 열쇠입니다. 이메일은 URL이 아닙니다. WC 체크 아웃 블록의 청구 양식에 있습니다. 우리는 이메일 클라이언트 측을 쿠키로 캡처 한 다음 영수증 페이지는 쿠키 + URL 키를 읽고 동일하게 실행 lookupOrder 단계 9.에서 서버 작업
캡처 구성 요소는 Straightforward (이메일 입력의 커플을 읽고, 쿠키에 쓰기) 그러나 WC 체크 아웃 블록은 fussy입니다 : 그것은 필드 동기화를 마운트하고, “지구에 대한 배송 주소를 사용” toggles, 그리고 – 놀라움 – 자신의 세션 저장에서 hydrates 필드 값 금융 없음 input 또는 change 행사일정. 위임 input 청취자는 완전히 자동 채우기를 놓습니다. 3개의 근원은 간격을 덮습니다:
- 초기 DOM 검사 마운트에서 – 이미 렌더링 시간 (autofill, browser autocomplete)에서 값을 잡아.
- 파일 형식 으로
document.body이름 *attributeFilter: ['value']– 늦게 장착 된 입력 및 세션 복원 된 값 쓰기를 잡아. - 캡처 단계
input/ 한국어change이름 * 으로document– 태핑을 잡아.
'use client';
import { useEffect } from 'react';
import { CHECKOUT_EMAIL_COOKIE } from '@/utils/constants';

// WC 체크 아웃 블록은 비동기적으로 재 마운트를 마운트합니다.
// 고객 toggles "사용 배송
// 청구". 또한 자체 세션 저장의 값도
// 입력/변경 이벤트를 제외하고는 - 소외된 청취자
// autofilled 이메일을 놓습니다. 우리는 3개의 근원을 필요로 합니다:
//  1. 마운트에서 초기 DOM 검사 - 이미 존재하는 값을 잡아.
//  2. MutationObserver - 늦게 장착 된 입력을 잡아
//  session-restored 값 쓰기.
//  3. 입력/변경 위임 — 실시간 사용자 입력.
function isEmailField(el: Element | null): el is HTMLInputElement {
  if (!(el instanceof HTMLInputElement)) return false;
  if (el.type === 'email') return true;
  const probe = `${el.name} ${el.id} ${el.autocomplete}`.toLowerCase();
  return probe.includes('email');
}

function writeCookie(value: string): void {
  const trimmed = value.trim();
  if (!trimmed) return;
  const secure = location.protocol === 'https:' ? '; secure' : '';
  document.cookie = `${CHECKOUT_EMAIL_COOKIE}=${encodeURIComponent(trimmed)}; ` +
    `path=/; max-age=3600; samesite=lax${secure}`;
}

function scan(root: ParentNode): void {
  root.querySelectorAll<HTMLInputElement>(
    'input[type="email"], input[name*="email" i], input[id*="email" i], input[autocomplete*="email" i]',
  ).forEach((el) => { if (isEmailField(el) && el.value) writeCookie(el.value); });
}

export function CheckoutEmailCapture() {
  useEffect(() => {
    scan(document);

    const handler = (e: Event) => {
      if (e.target instanceof Element && isEmailField(e.target)) {
        writeCookie((e.target as HTMLInputElement).value);
      }
    };
    document.addEventListener('input', handler, true);
    document.addEventListener('change', handler, true);

    const observer = new MutationObserver((muts) => {
      for (const m of muts) {
        m.addedNodes.forEach((n) => { if (n instanceof Element) scan(n); });
        if (m.type === 'attributes' && m.target instanceof HTMLInputElement
            && isEmailField(m.target)) {
          writeCookie(m.target.value);
        }
      }
    });
    observer.observe(document.body, {
      subtree: true, childList: true,
      attributes: true, attributeFilter: ['value'],
    });

    return () => {
      document.removeEventListener('input', handler, true);
      document.removeEventListener('change', handler, true);
      observer.disconnect();
    };
  }, []);
  return null;
}
그 위에 /checkout/page.tsx 다음 것 <Content> 블록 및 쿠키는 고객 클릭 플레이스 주문에 의해 설정됩니다. 영수증 페이지는 그것을 읽고 렌더링합니다 – 양식 없음, 추가 클릭 없음.
import Link from 'next/link';
import { cookies } from 'next/headers';
import { OrderSummary } from '@/components/OrderSummary';
import { lookupOrder } from '@/actions/order';
import { CHECKOUT_EMAIL_COOKIE } from '@/utils/constants';

interface Props {
  params: Promise<{ id: string }>;
  searchParams: Promise<{ key?: string }>;
}

export default async function OrderReceivedPage({ params, searchParams }: Props) {
  const { id } = await params;
  const { key } = await searchParams;
  const email = (await cookies()).get(CHECKOUT_EMAIL_COOKIE)?.value ?? '';
  const fallback = key ? `/view-order?key=${encodeURIComponent(key)}` : '/view-order';

  if (!key || !email) {
    return (
      <main>
        <h1>Thanks for your order</h1>
        <p>We couldn't auto-load the receipt because your billing email isn't
          available on this device. Look up the order with the email you used at
          checkout — the order key from your confirmation email is the shared
          secret.</p>
        <Link href={fallback}>Look up the order</Link>
      </main>
    );
  }

  const { order, error } = await lookupOrder(email, key);
  if (!order) {
    return (
      <main>
        <h1>Thanks for your order</h1>
        <p className="error">{error ?? "We couldn't find that order."}</p>
        <Link href={fallback}>Look up the order</Link>
      </main>
    );
  }

  return (
    <main>
      <OrderSummary
        order={order}
        headline="Thanks for your order"
        intro="Your order has been received. A copy of this receipt is on its way to your inbox."
      />
    </main>
  );
}
관련 링크 /view-order?key=… “customer는 새로운 장치에서 영수증 이메일을 3 일 나중에 다시 열었다”의 경우 – 쿠키가 사라지지만 이메일의 주문 키는 여전히 수동 조회를 위해 작동합니다.
단계 11 – 제품 리뷰
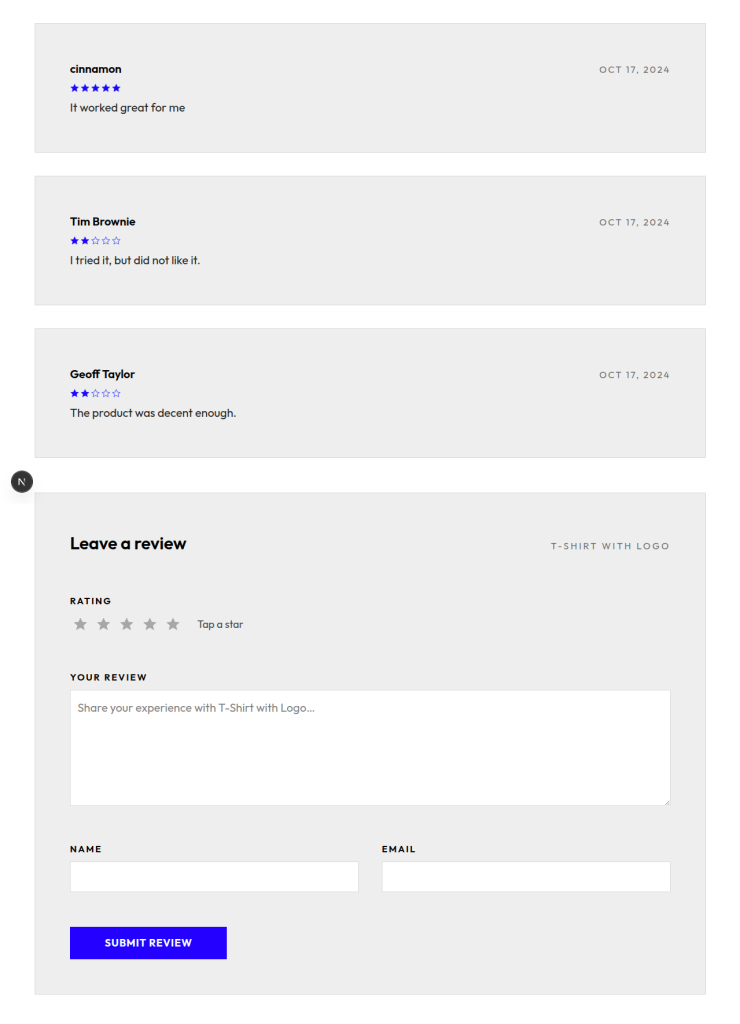
WooGraphQL을 호출하는 작은 POST 핸들러입니다. writeReview 이름 * 클라이언트 양식 sends productId, 저자 이름, 이메일, 등급 및 내용; 경로 첨부 Cart-Token, mutation을 실행, 및 WP 백엔드 핸들 모멘트 큐, 스팸 체크 및 저장.
import { NextRequest, NextResponse } from 'next/server';
import { cookies } from 'next/headers';
import { gqlWithSession } from '@/lib/wp';

export async function POST(req: NextRequest) {
  const { productId, author, email, content, rating } = await req.json();
  const sessionToken = (await cookies()).get('sessionToken')?.value ?? null;

  const result = await gqlWithSession<{ writeReview: { rating: number } }>(
    `mutation Write($input: WriteReviewInput!) {
       writeReview(input: $input) {
         rating
         review { id }
       }
     }`,
    { input: {
      commentOn: productId,
      author, authorEmail: email,
      content, rating,
    } },
    { sessionToken },
  );

  if (result.errors?.length) {
    return NextResponse.json({ error: result.errors[0].message }, { status: 400 });
  }
  return NextResponse.json({ ok: true, rating: result.data?.writeReview?.rating });
}
연결하기 <ReviewForm /> 내부 고객 구성품 <ProductTabs /> 제품 페이지 리뷰 목록 자체는 동일한 제품 쿼리에서 서버 측을 렌더링합니다. pagination은 당신이 그것을 원하는 것은 모두입니다.
연기 테스트 전체 흐름
종료 : 방문 /products/hoodie, 색상 + 로고 변형을 선택, 카트에 추가 클릭, 땅에 /cart 표시된 항목으로, 체크 아웃에 Proceed를 클릭, 스트립 테스트 카드에 기입 4242 4242 4242 4242, 주문 배치, 땅에 /checkout/order-received/[id]?key=… 전체 영수증이 자동으로 렌더링됩니다. 다섯 번의 클릭, 싱글 Next.js 호스트, 전체 WooCommerce 백엔드 오케스트라. 로그인 없음, 계정 없음, JWT 새로 고침 루프.
체크 아웃 페이지가 “빈 카트에서 주문을 만들 수 없습니다”- fetchAssetsByUri gotcha 에서 단계 4. 자주 묻는 질문 /graphql 그 실행 assetsByUri SSR 측에 들어가는 것을 확인합니다. Cart-Token 머리. 카트 차단 frontend는 REST에서 비롯되지만, 체크 아웃 블록의 사전 로드 wcSettings.checkoutData 생성된 서버 측은 Asset-fetch 시간 및 전체 UI를 게이트합니다.
당신은 빌드하지 않았다
- 지불 게이트웨이 – 줄무늬, 페이팔, 광장, Klarna, ~50 다른 사람
- 세금 엔진 – WooCommerce 세금 (무료), Avalara, TaxJar
- 선박 비율 APIs — USPS, UPS, 페더럴 익스프레스, DHL의 주문 편평한 비율 논리
- 구독 – 청구주기, 시험, 감사, 평가 된 업그레이드
- Inventory – 재고 수준, 낮은 재고 알림, 백 주문, 당 가변 추적
- 쿠폰 엔진 – 사용 제한, 고객 세그먼트, 제품 / 범주 제한
- 주문 관리 – 환불, 부분 환불, 주문 메모, 고객 이메일
- 검토 모멘트 – 스팸 검사, profanity 필터, 큐 UI
WooCommerce는 모두 취급합니다. 제품 페이지 UX와 storefront 크롬을 처리합니다. NextPress는 “나는 원하는 방법”과 “내가 샀던 확장과 함께 작동”을 선택하지 않고 두 가지를 연결합니다.
단축키: WooGraphQL Pro 구독
위의 모든 것은 오픈 소스 경로입니다. 그것은 블로그 튜토리얼 상단에 새로운 코드의 몇 백 라인, 추가 의존성, 그리고 데모 repo는 clone 준비가. 팀의 시간은 세션 관리 수명주기 코드를 작성하는 것보다 storefront UX에 더 잘 보냈다면, 정확히 무엇이 우그래픽QL Pro 구독 으로.
구독 번들 세 가지:
WooGraphQL 프로 플러그인
WordPress 플러그인은 GraphQL 스키마를 유형, 쿼리 및 WooCommerce 제품에 대한 mutations로 확장합니다. 구독, 복합 제품, 제품 번들 및 제품 부가 기능. 무료 WooGraphQL 스키마는 단순하고 변하기 쉬운 제품을 노출합니다. 카탈로그에는 뭉치 또는 구독이 포함되어 있으며, 핸드 롤링 REST fallbacks가 있습니다. 프로 플러그인으로, 그 제품 유형은 스키마의 일류이며, 단일 { product(id: …) } 쿼리는 어떤 모양이 될 수 있는지 반환합니다.
생성-woonext-app CLI
· 같은 작품의 비계 create-next-app, 그러나 보일러판 생성은 작동 Next.js + WooGraphQL storefront입니다. npx create-woonext-app my-shop, 당신의 WP 백엔드에 그것을 점하거든, 당신은 당신이 파일을 접촉하기 전에 제품 페이지, 손수레, 체크 아웃 및 계정 교류를 얻고 있습니다 — 모두는 아래에 직업적인 걸이 및 성분으로 위로 타전했습니다.
@woographql/* JS 패키지
- @woographql/다음 — 동일한 방식으로 shadcn/ui를 작동하는 구성 요소 세대 툴킷은 명령을 실행하고, 구성 요소 땅을 자신의 코드를 사용자 정의합니다. 구성 요소 라이브러리 전체 storefront 표면 커버 —
CartOptions모든 제품 유형 Woo 지원 (Simple, Variable, Composite, Bundle, Subscription, Add-On)에 대한 카트 액션 UI를 렌더링합니다. - @woographql/react 걸이 — 당신이 위에 썼던 Lifecycle 코드를 붕괴시킨 Hooks를 입력했습니다.
useSessionManager()쿠키-juggling, 카트-토큰 교체 및 SSR-time 헤더 포워딩을 대체합니다.useCartMutations()대체하기/api/cart루트 플러스 클라이언트 접착제, 낙관적인 업데이트 및 per-key 오류 롤백 포함. - @woographql/보존 — 더 낮은 수준의 건물 블록 그 후크: 토큰 암호화, 쿠키/ 저장 요약, 서명 상태 serialization. 조금은 당신이 다음에 두 번째 Woo storefront을 배송 한 번 단순화하지 않습니다.
오픈 소스 경로를 선택하면 후드에서 무슨 일이 일어나는지 이해하기를 원합니다. 시작해야 할 좋은 곳이며 코드를 영원히 유지하십시오. 상점을 발송하고 세션 관리 라이브러리 저자가되지 않는 경우 구독을 선택합니다. 어쨌든,이 튜토리얼의 아키텍처는 올바른 아키텍처입니다. 구독은 입력 된대로 수명주기 코드의 광택 된 버전을 제공합니다.
이 잘못된 호출 때
- 상업 의존성 및 단일 제품 카탈로그가없는 Greenfield 프로젝트. Stripe Checkout + 사용자 정의 React 저장소 앞 배 빠른. WP + Woo에서 당기는 것은 세금, 배송 또는 여러 SKU를 필요로 할 때까지 과잉입니다.
- 손 가격 B2B 견적. “Request a Quote, get price, replace to order”에 대한 카트 빌더 워크플로우는 뜻깊은 사용자 정의 작업없이 Woo의 카탈로그 모델에 정리하지 않습니다.
- Multi-vendor 시장. Woo는 멀티 벤더 확장을 가지고 있지만 복잡합니다. Medusa와 같은 시장 기반 플랫폼은 일반적으로 더 잘 맞습니다.
나머지의 경우 – 대부분의 응용 프로그램은 상거래가 필요합니다, 특히 WordPress에서 이미 서빙 콘텐츠를 제공합니다 – 상업 배경 및 NextPress를 다리로 추가하면 오후에 “사이트의 나머지”와 동일한 Next.js 호스트에 제품을 판매합니다. 구독, 사용자 정의 지불 게이트웨이, 다중 통화, 버려진 캐트 복구, B2B 가격 계층 – 그들은 WP 관리자에 대한 확장 설치, 당신의 응용 프로그램에 대 한 다시 팩.
Leave a Reply